Styled Nodes in Unreal Engine
In this article, I will show you how to style your Unreal Engine nodes, such as the following:

This technique is achieved through the use of K2 Nodes. A deep dive into K2 nodes is out of scope for now, but suffice to say that they’re used to create new Blueprint nodes from scratch. All of the “magical” nodes that Unreal provides by default, such as the Break Struct node are implemented as K2 nodes.
When you declare a C++ function using UFUNCTION(BlueprintCallable), the UHT will pick this up and automatically create a K2 node of type UK2Node_CallFunction. This is also the base class we will use, for our own little magic trick.
In a nutshell, we will be replacing nodes with K2 copies, which can be styled.
Creating the K2 Node
Create the Module
K2 Nodes operate at editor time, and are “compiled” out of the node graph during export. Thus, we need to create a new UncookedOnly module, and create our K2 node there. After creating the module, you can include these as public dependencies:
BlueprintGraphUnrealEd
K2 Node
Next, create a class for our K2 node. It is customary to use the UK2Node_ prefix for these types. For example:
UCLASS()
class FANCYNODESEDITOR_API UK2Node_FancyNode : public UK2Node_CallFunction
{
	GENERATED_BODY()

public:
	virtual void GetMenuActions(FBlueprintActionDatabaseRegistrar&) const override;
	static void Initialize(UEdGraphNode* NewNode, bool, UFunction* Function);
};
The first function GetMenuActions is part of the UK2Node base class, and technically the only required function. Initialize is a static function that we declare here for convenience -we will use it later to make each generated node call the right function.
Implementation
GetMenuActions is used within the K2 node to generate a list of Blueprint nodes, which will be available in the Blueprint graph. It’s very convenient for us that this is GetMenuActions and not GetMenuAction, because it means that we only need to define a single K2 node in order to hook and replace many functions at once.
The psuedo-explanation for our goal goes something like this:
- Loop over all functions, and locate the ones we want to style
- Hide the old function
- Create a new blueprint node that calls this function for us
- Style the newly created node to our liking
Cut down as much as possible, that might look something like this:
void UK2Node_FancyNode::GetMenuActions(FBlueprintActionDatabaseRegistrar& BlueprintAction) const
{
	UClass* NodeClass = GetClass();

	for (auto* Function : TObjectRange<UFunction>())
	{
		if (!Function->HasAllFunctionFlags(FUNC_BlueprintCallable))
		{
			continue;
		}

		if (!Function->HasMetaData("Fancy"))
		{
			continue;
		}

		Function->SetMetaData(FBlueprintMetadata::MD_BlueprintInternalUseOnly,TEXT("true"));

		auto* NodeSpawner = UBlueprintNodeSpawner::Create(GetClass());
		NodeSpawner->CustomizeNodeDelegate.BindWeakLambda(Function, &Initialize, Function);

		BlueprintAction.AddBlueprintAction(NodeClass, NodeSpawner);
	}
}
The line NodeSpawner->CustomizeNodeDelegate.BindWeakLambda(Function, &Initialize, Function); uses our static function from earlier, and just ensures that the new function actually calls the old function. We can define it like this:
void UK2Node_FancyNode::Initialize(UEdGraphNode* NewNode, bool, UFunction* Function)
{
	CastChecked<ThisClass>(NewNode)->SetFromFunction(Function);
}
If you compile now, any matching function will be hidden, and replaced by the K2 Node. You can try this out by adding meta=(Fancy) to one of your functions. e.g.,UFUNCTION(BlueprintCallable, meta=(Fancy)).
The matching function is, so far, functionally identical, but “worse” in a few ways. For example, tooltips and function category are no longer set. We will fix this later.
Styling the Function
Now that we’ve replaced the default Blueprint nodes with our own, we can start styling them. This tutorial won’t cover everything, but for some inspiration, here is some stuff you can style:
- Color scheme
- Right-side icon
- Left side icon
- Tooltip
- Function path
- Function name/title
- Function context
To get started, you can simple override some functions on you K2 node, and implement them. For example:
FLinearColor GetNodeTitleColor() const override;
FSlateIcon GetIconAndTint(FLinearColor& outColor) const override;
FLinearColor UK2Node_FancyNode::GetNodeTitleColor() const
{
	return FLinearColor::FromSRGBColor(FColor::FromHex(TEXT("420039")));
}

FSlateIcon UK2Node_FancyNode::GetIconAndTint(FLinearColor& outColor) const
{
	outColor = FLinearColor(.823f, .823f, .823f);
	return FSlateIcon(FAppStyle::GetAppStyleSetName(), "ClassIcon.BlendSpace");
}
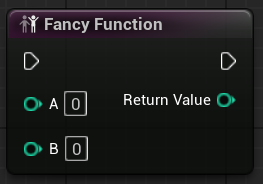
This will create a purple function with the blend space icon. Something like this:

Dynamic Styles
Now that you’ve styled your nodes, you might be wondering how you can actually pick a style per-node. This is easy as well. Simple adjust the meta-data approach from a switch into a field: UFUNCTION(BlueprintCallable, meta=(Style=Yellow)).
We can read this field inside of our K2 node, and then switch on the result. Note: If you’re doing this a lot, you will want to write something less verbose than this, such as a lookup table.
FLinearColor UK2Node_FancyNode::GetNodeTitleColor() const
{
	const FString Style = GetTargetFunction()->GetMetaData(TEXT("Style"));
	if (Style == "Yellow")
	{
		return FLinearColor::FromSRGBColor(FColor::Yellow);
	}
	return FLinearColor::FromSRGBColor(FColor::Black);
}
Extras
If you’re not sold yet, there is even more funny-business you can pull, so read on!
Automatic Tooltip/Nodepath
Our current styled nodes are missing information that was defined on the original node, such as the nodes tooltip and path. These fields are easily copied from one node to the next by setting fields on the node spawners menu signature. For example:
auto& Menu = NodeSpawner->DefaultMenuSignature;
Menu.MenuName = Function->GetDisplayNameText();
Menu.Category = GetDefaultCategoryForFunction(Function, FText::GetEmpty());
You can do the same for DocLink, DocExcerptTag etc.
Hiding Nodes
If styling nodes wasn’t enough, it’s possible to hide (and not replace) nodes. This is one way you can prevent some node from being used in your project. Instead of relying on a user-defined meta field, you can just reference the node by name, or some other identifiable feature.
Editing Nodes
Even more powerful than the above, it’s possible to edit existing nodes, such as adding or hiding pins. This is cleverly used in ue5coro in order to hide unwanted execution pins from automatically generated latent nodes.
Examples
My original inspiration for this technique came to me while I was writing a stand alone plugin that I felt could benefit from it’s own style. I’m by far the only person who’s discovered the technique though. Here are some more examples: